
Remember that time I learned how to weave and then went crazy and made a 4′ x 6′ rug? Apparently I like a challenge!
This project just goes to show that you can make some epic home decor projects with the right instructions and plenty of creative optimism!
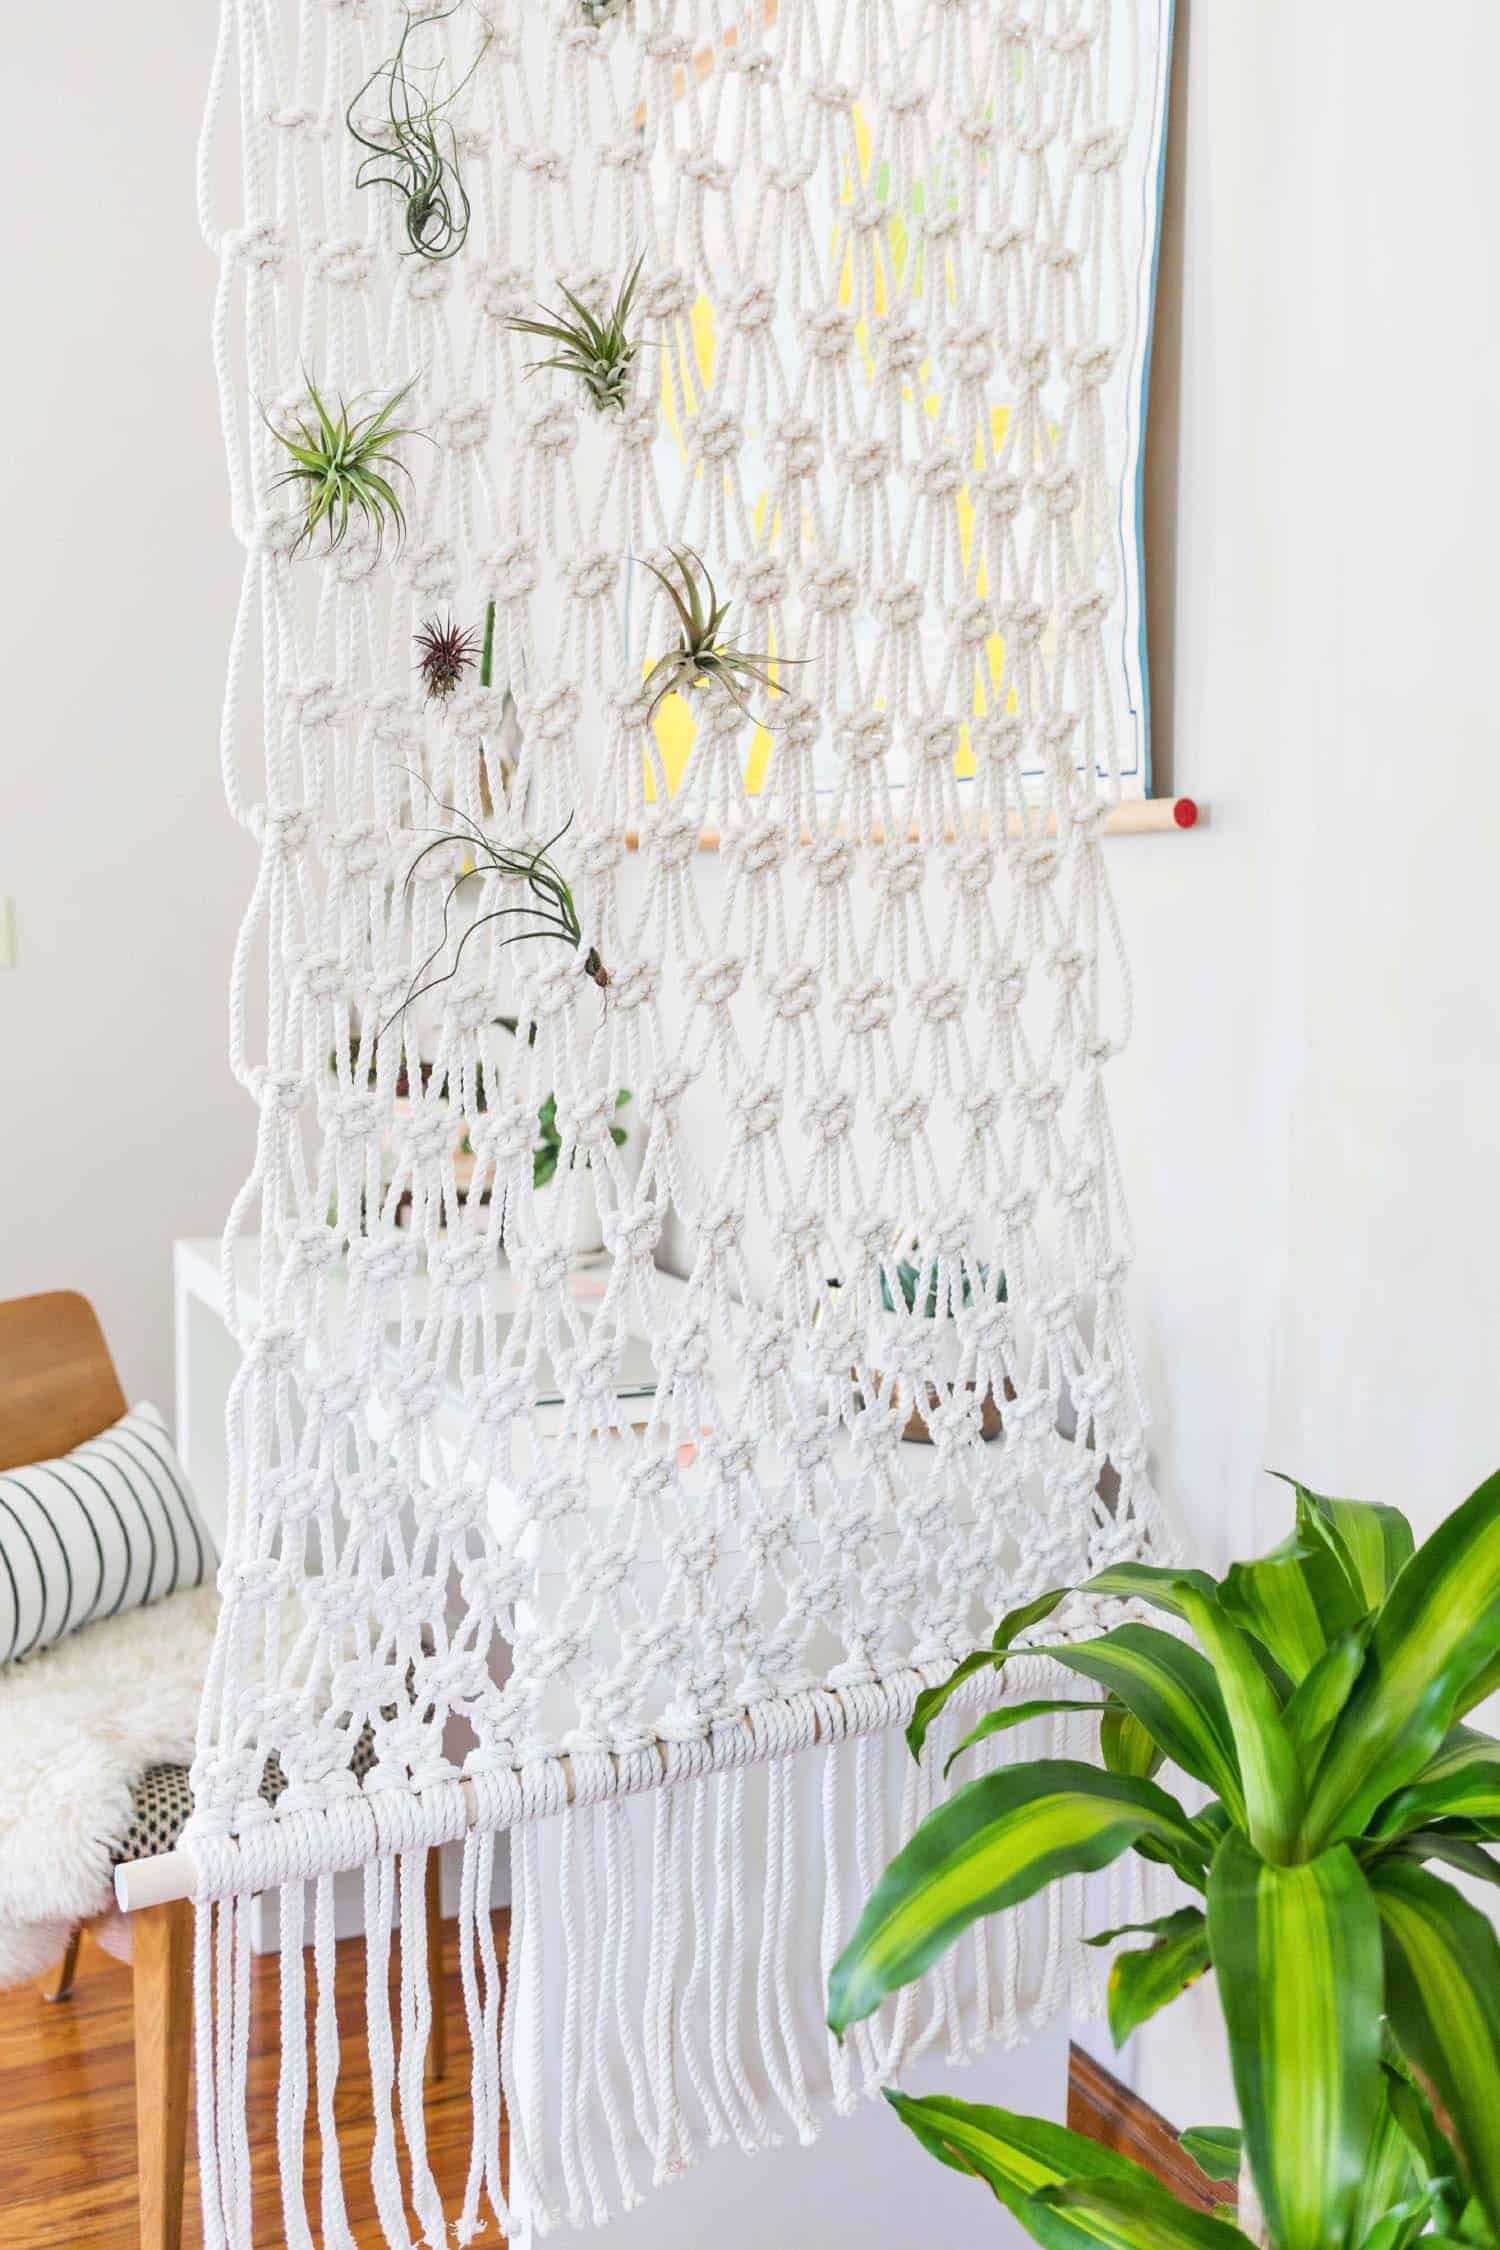
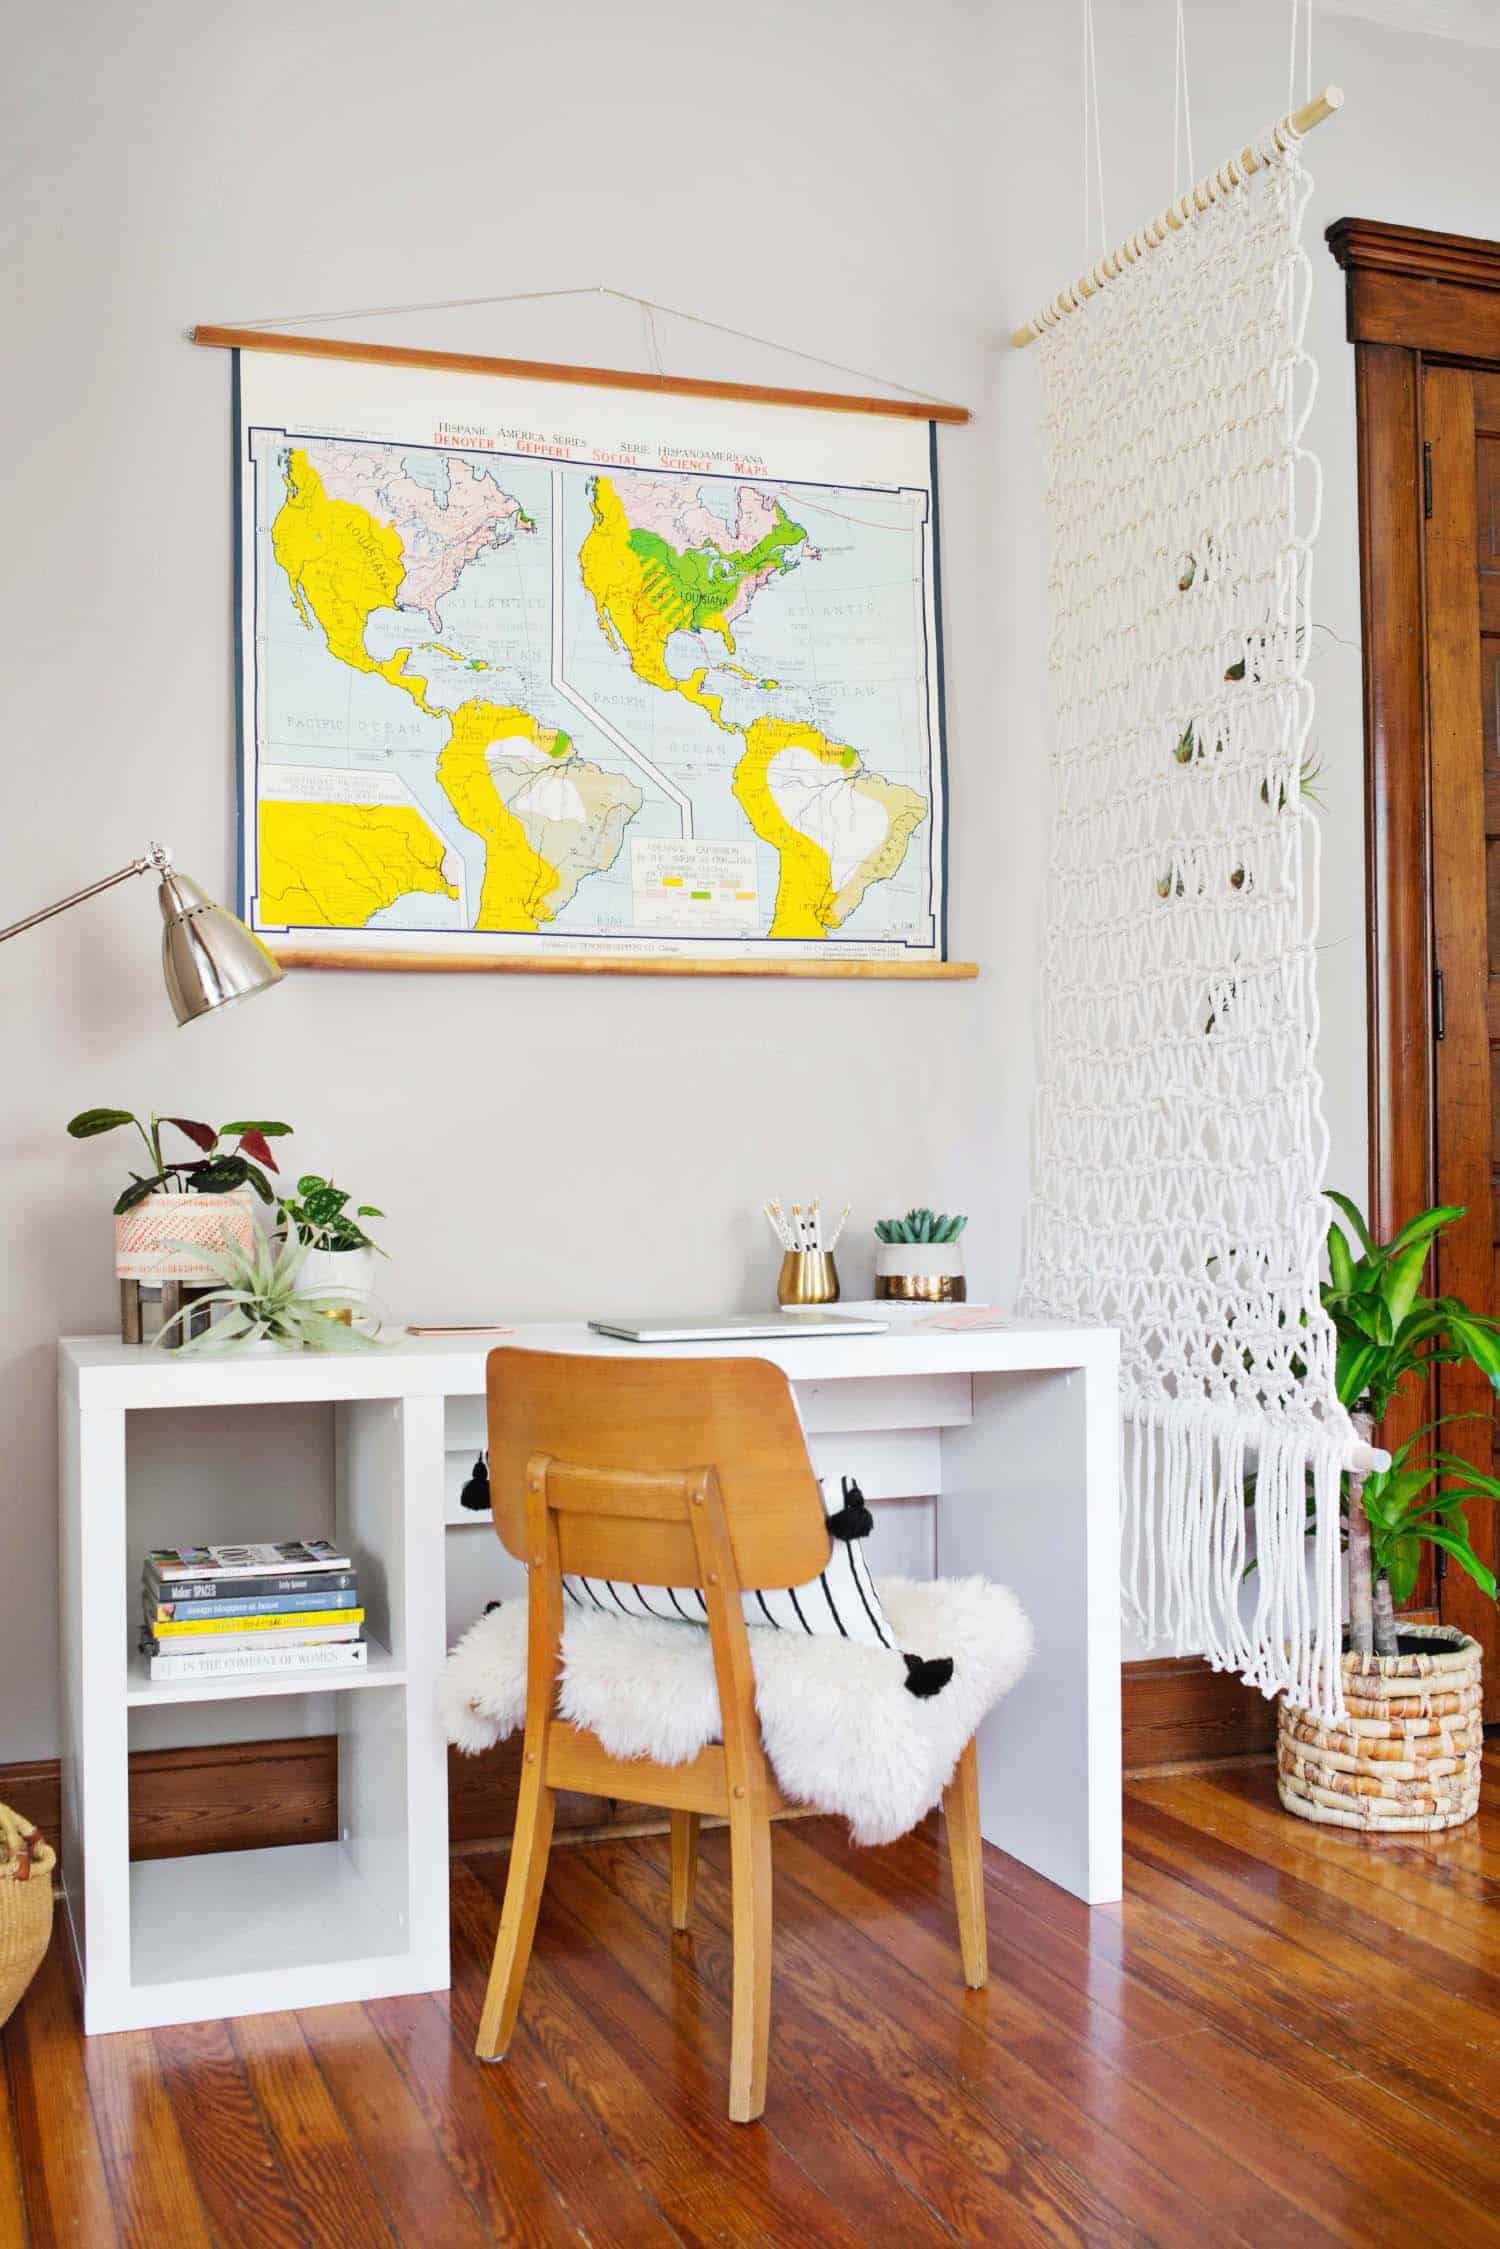
This macrame room divider DIY lends itself easily to creating a relaxed bohemian vibe while also working hard to define a space. Not only does it let plenty of light through, it’s another surface to add some plants.
Related: How To Macrame: A Step By Step Guide For Beginner, Make Your Own Macrame Curtain, How to Make Friendship Bracelets, Simple Macrame Camera Strap Tutorial
 Perfect for the studio apartment, shared office space, or gigantic room in need of definition. All it takes is the right kind of rope, a few simple knots, and the kind of patience these big projects sometimes require. Spoiler alert: It’s always worth it.
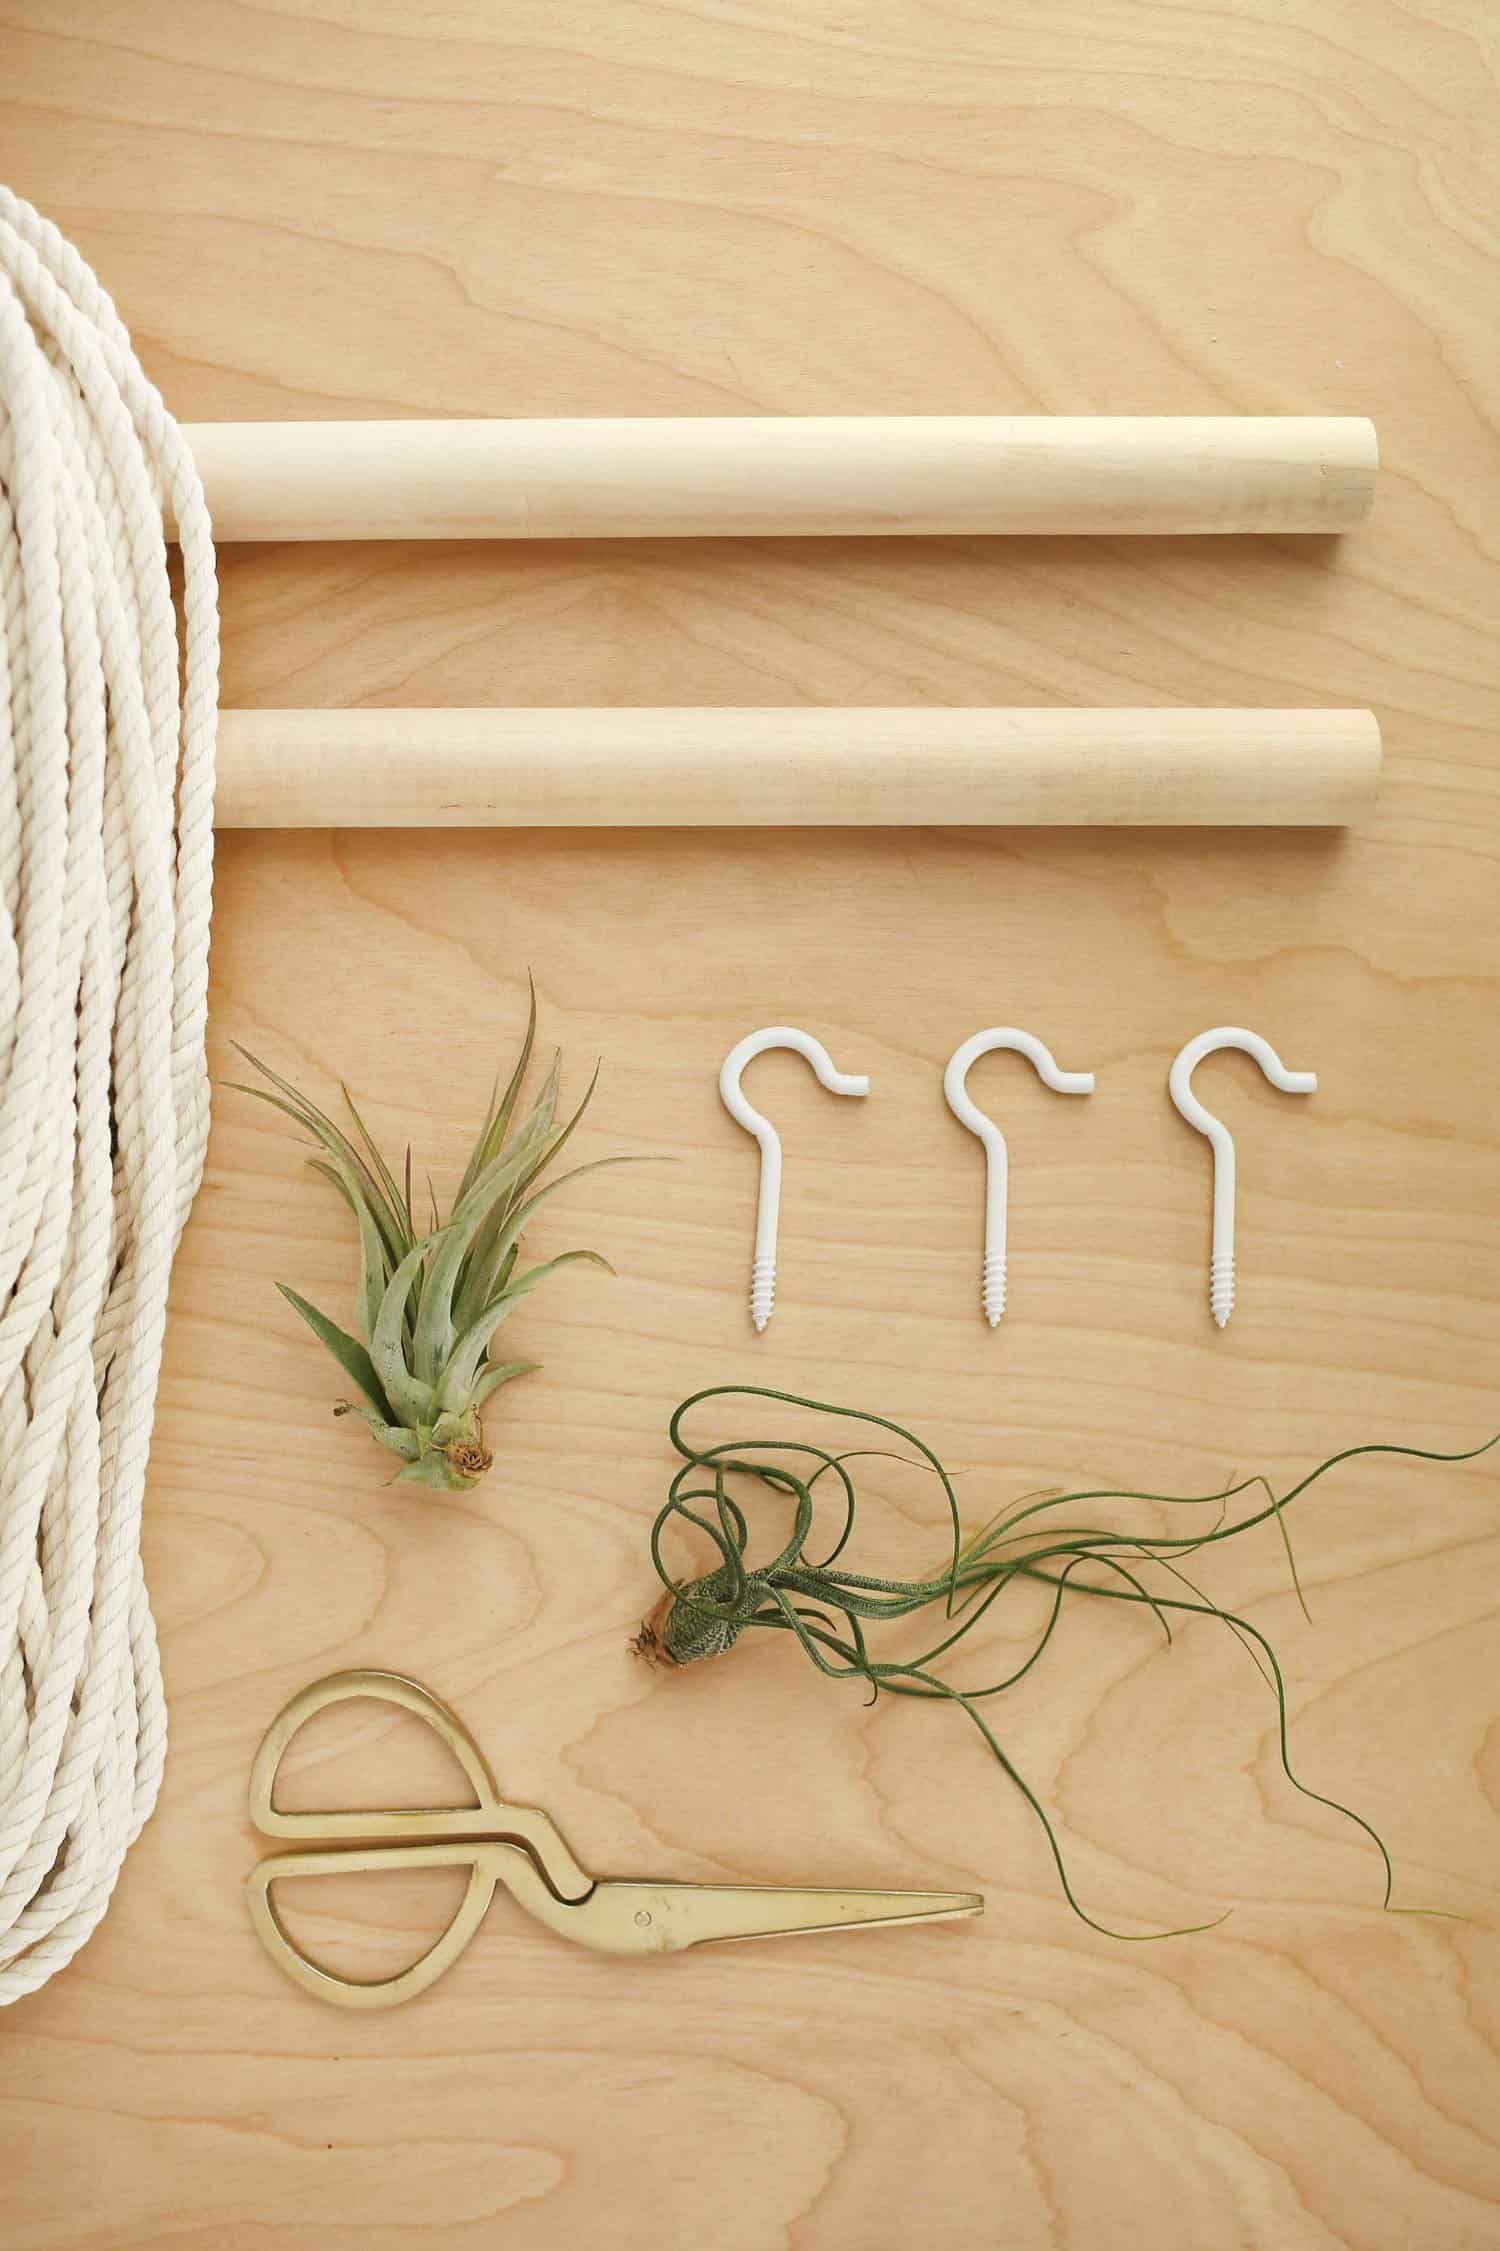 Supplies
-1″ x 36″ wooden dowel
–700 ft of 1/4″ 3 strand cotton rope
-three 3″ hook screws
-scissors
–air plants (optional)
Preparing Your Rope
For this specific project, you’ll want to measure out 24 strands that measure 28′ long each. This will give you a wall hanging that measures roughly 7′ from the top dowel to the bottom dowel and you can add length to it with fringe on the bottom.
If you’re wanting to design a shorter piece, it’s always better to still use more rope than you think you’ll need.
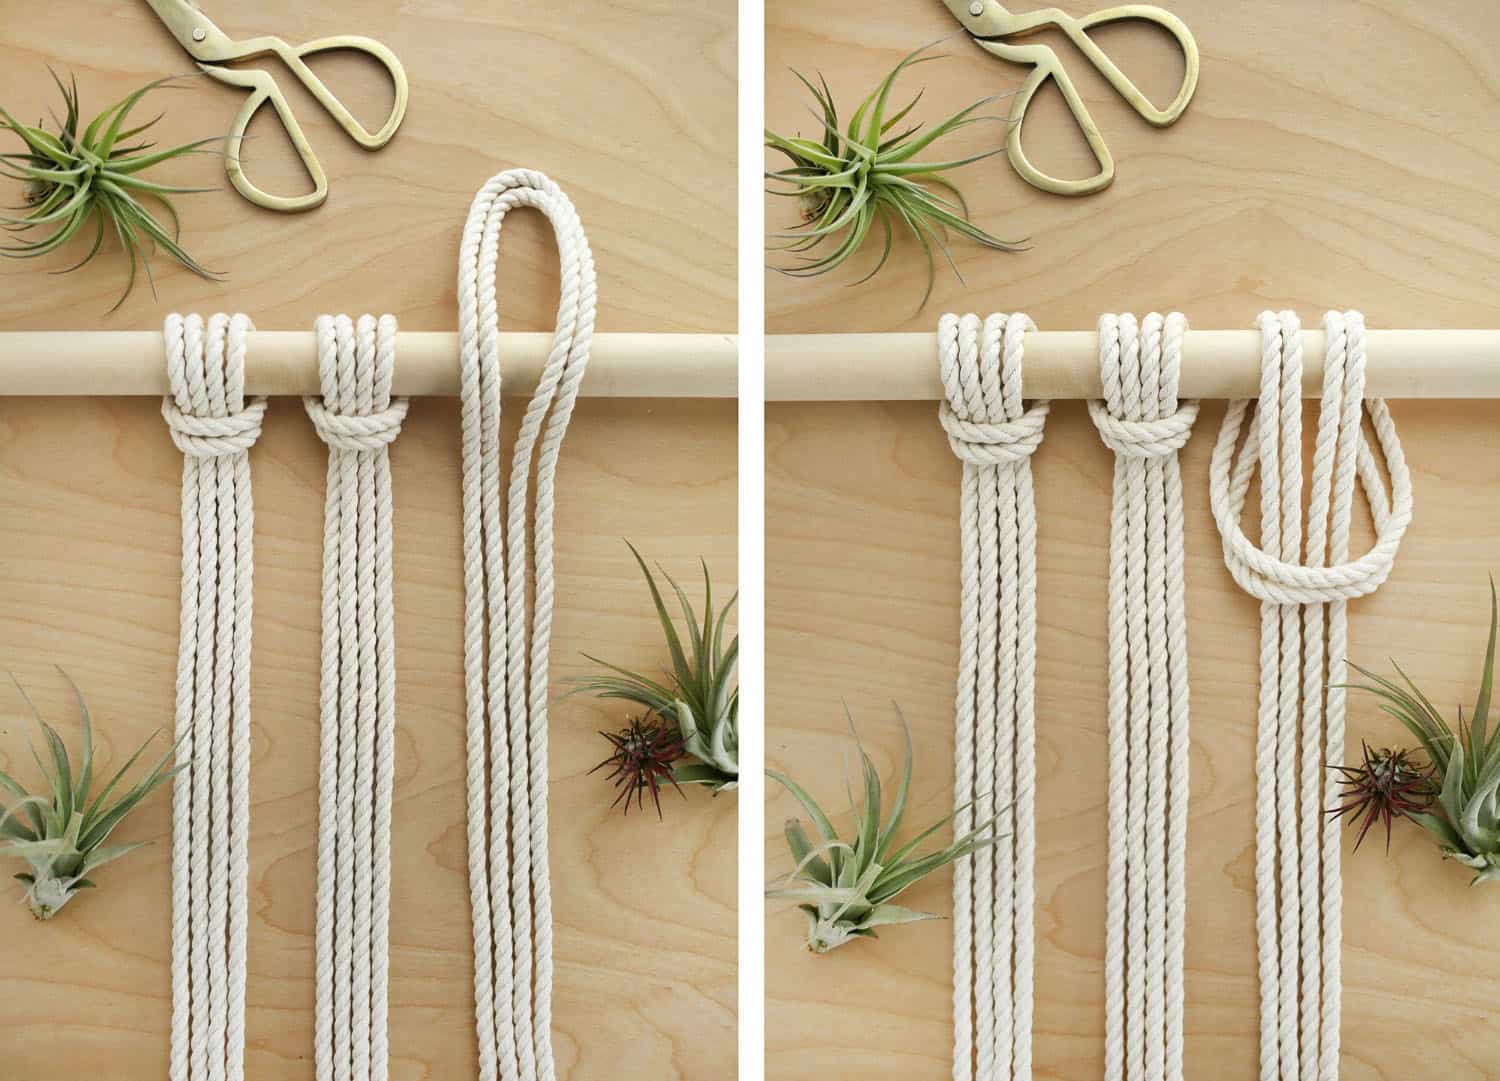 Lark’s Head Knot
Shown are two finished lark’s head knots and then the start of a third. You’ll need two strands of rope per knot for a total of 12 knots. Fold two strands in half and place the center of this pair of rope strands over the top of your first wooden dowel.
Then, wrap them around your dowel and pull the loose ends down through your loop. You’ve probably done this knot before and not even known it. No pun intended.
Continue adding your pairs of rope strands to the dowel until you are finished. Be mindful that you are wrapping over the top of the dowel consistently.
If you forget and wrap one under the dowel instead, it will change the look of your pattern. Make sure all of your finished lark’s head knots are spaced equally apart from each other.
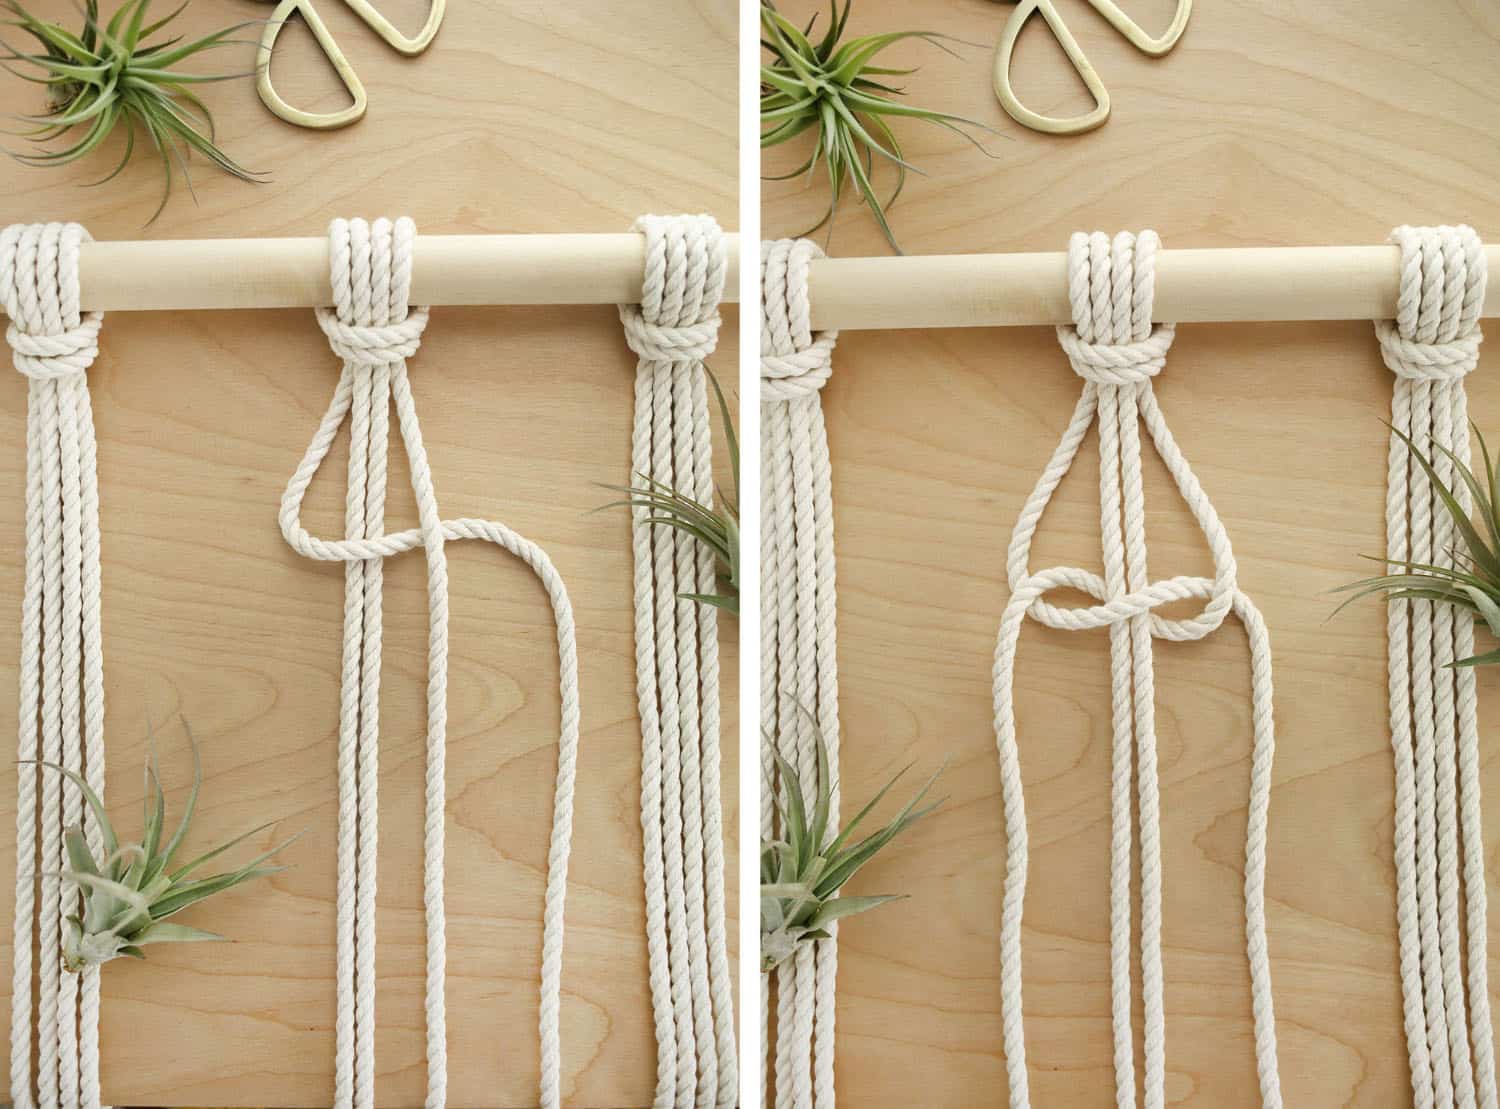 Half Knot
We’ll use a half knot further down in the design to add subtle contrast, but it also makes up the first step of the square knot, so I’m showing it first. A half knot requires four strands of rope.
The two center ropes stay where they are and the two outer ropes pull away just a bit. Then create a bend in the outer left rope and move it towards and then under the outer right rope as shown.
Then bend the outer right rope under the place where the outer left rope crossed it, behind the two center ropes, and back up through the bend from the outer left rope as shown.
We’ll use this knot on its own in a bit, but this is also the first half of the knot you’ll use for the first section of the divider.
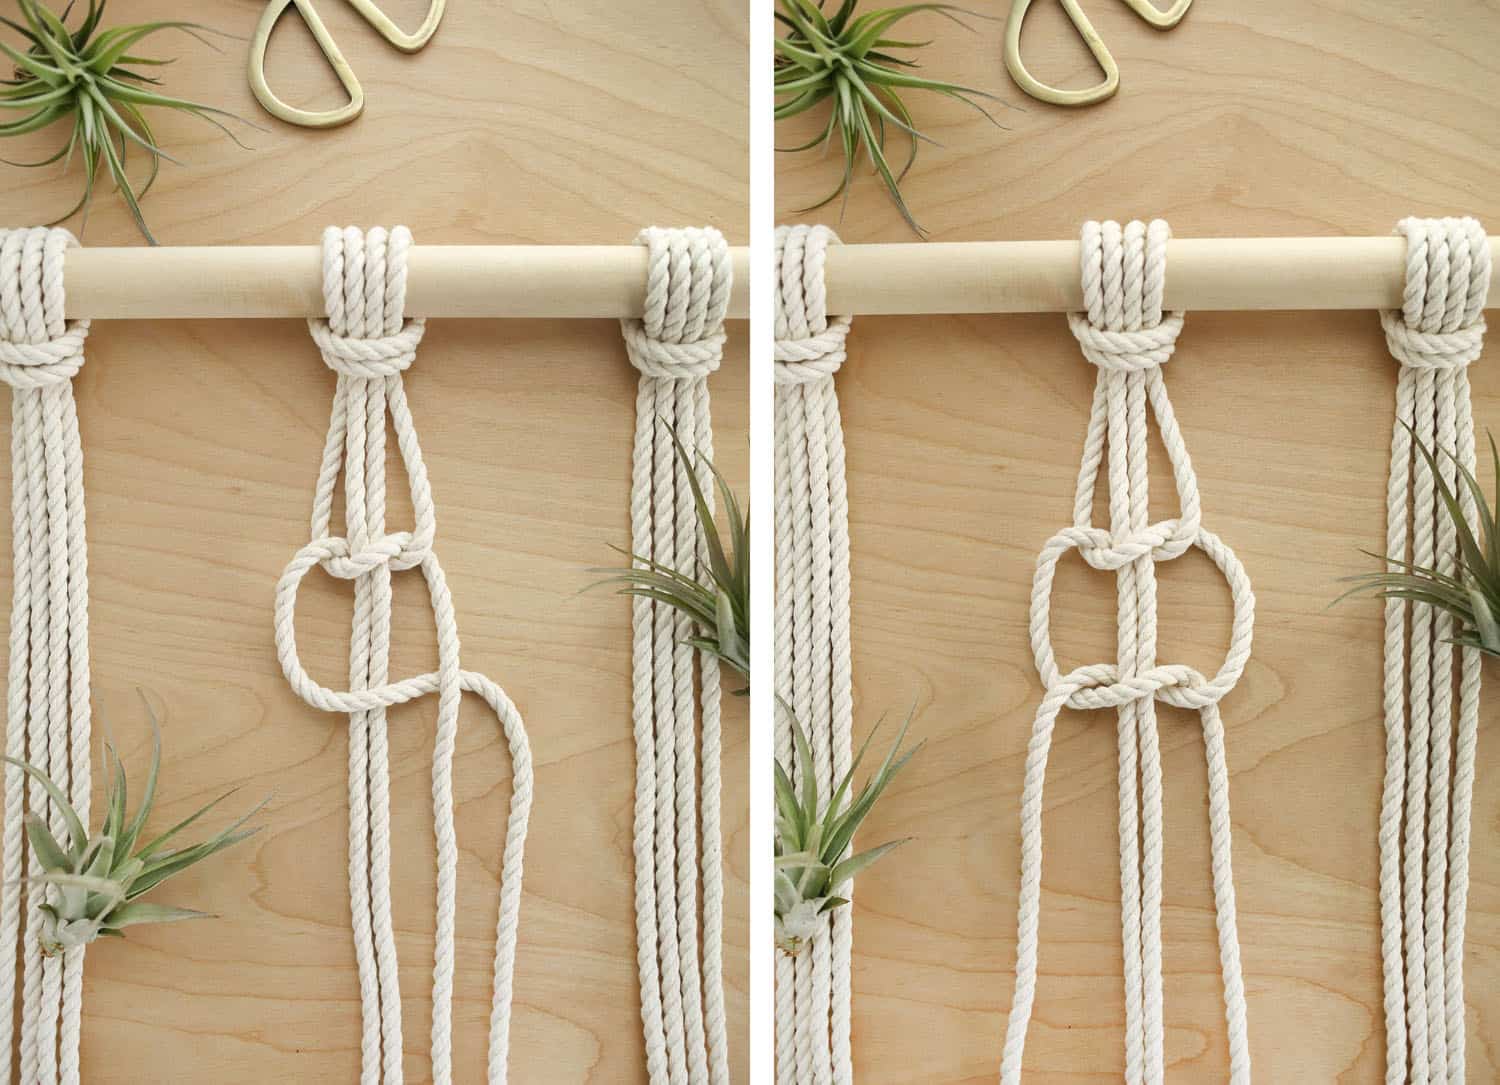 Square Knot
This is comprised of two half knots. Repeat the same pattern you did in the step above, but then pull the outer two rope strands until that second half knot rests snugly against the first half knot.
Now you’ve made a square knot! Repeat this process on each of your pairs of rope strands for your first row of knots.
 Alternating Square Knot
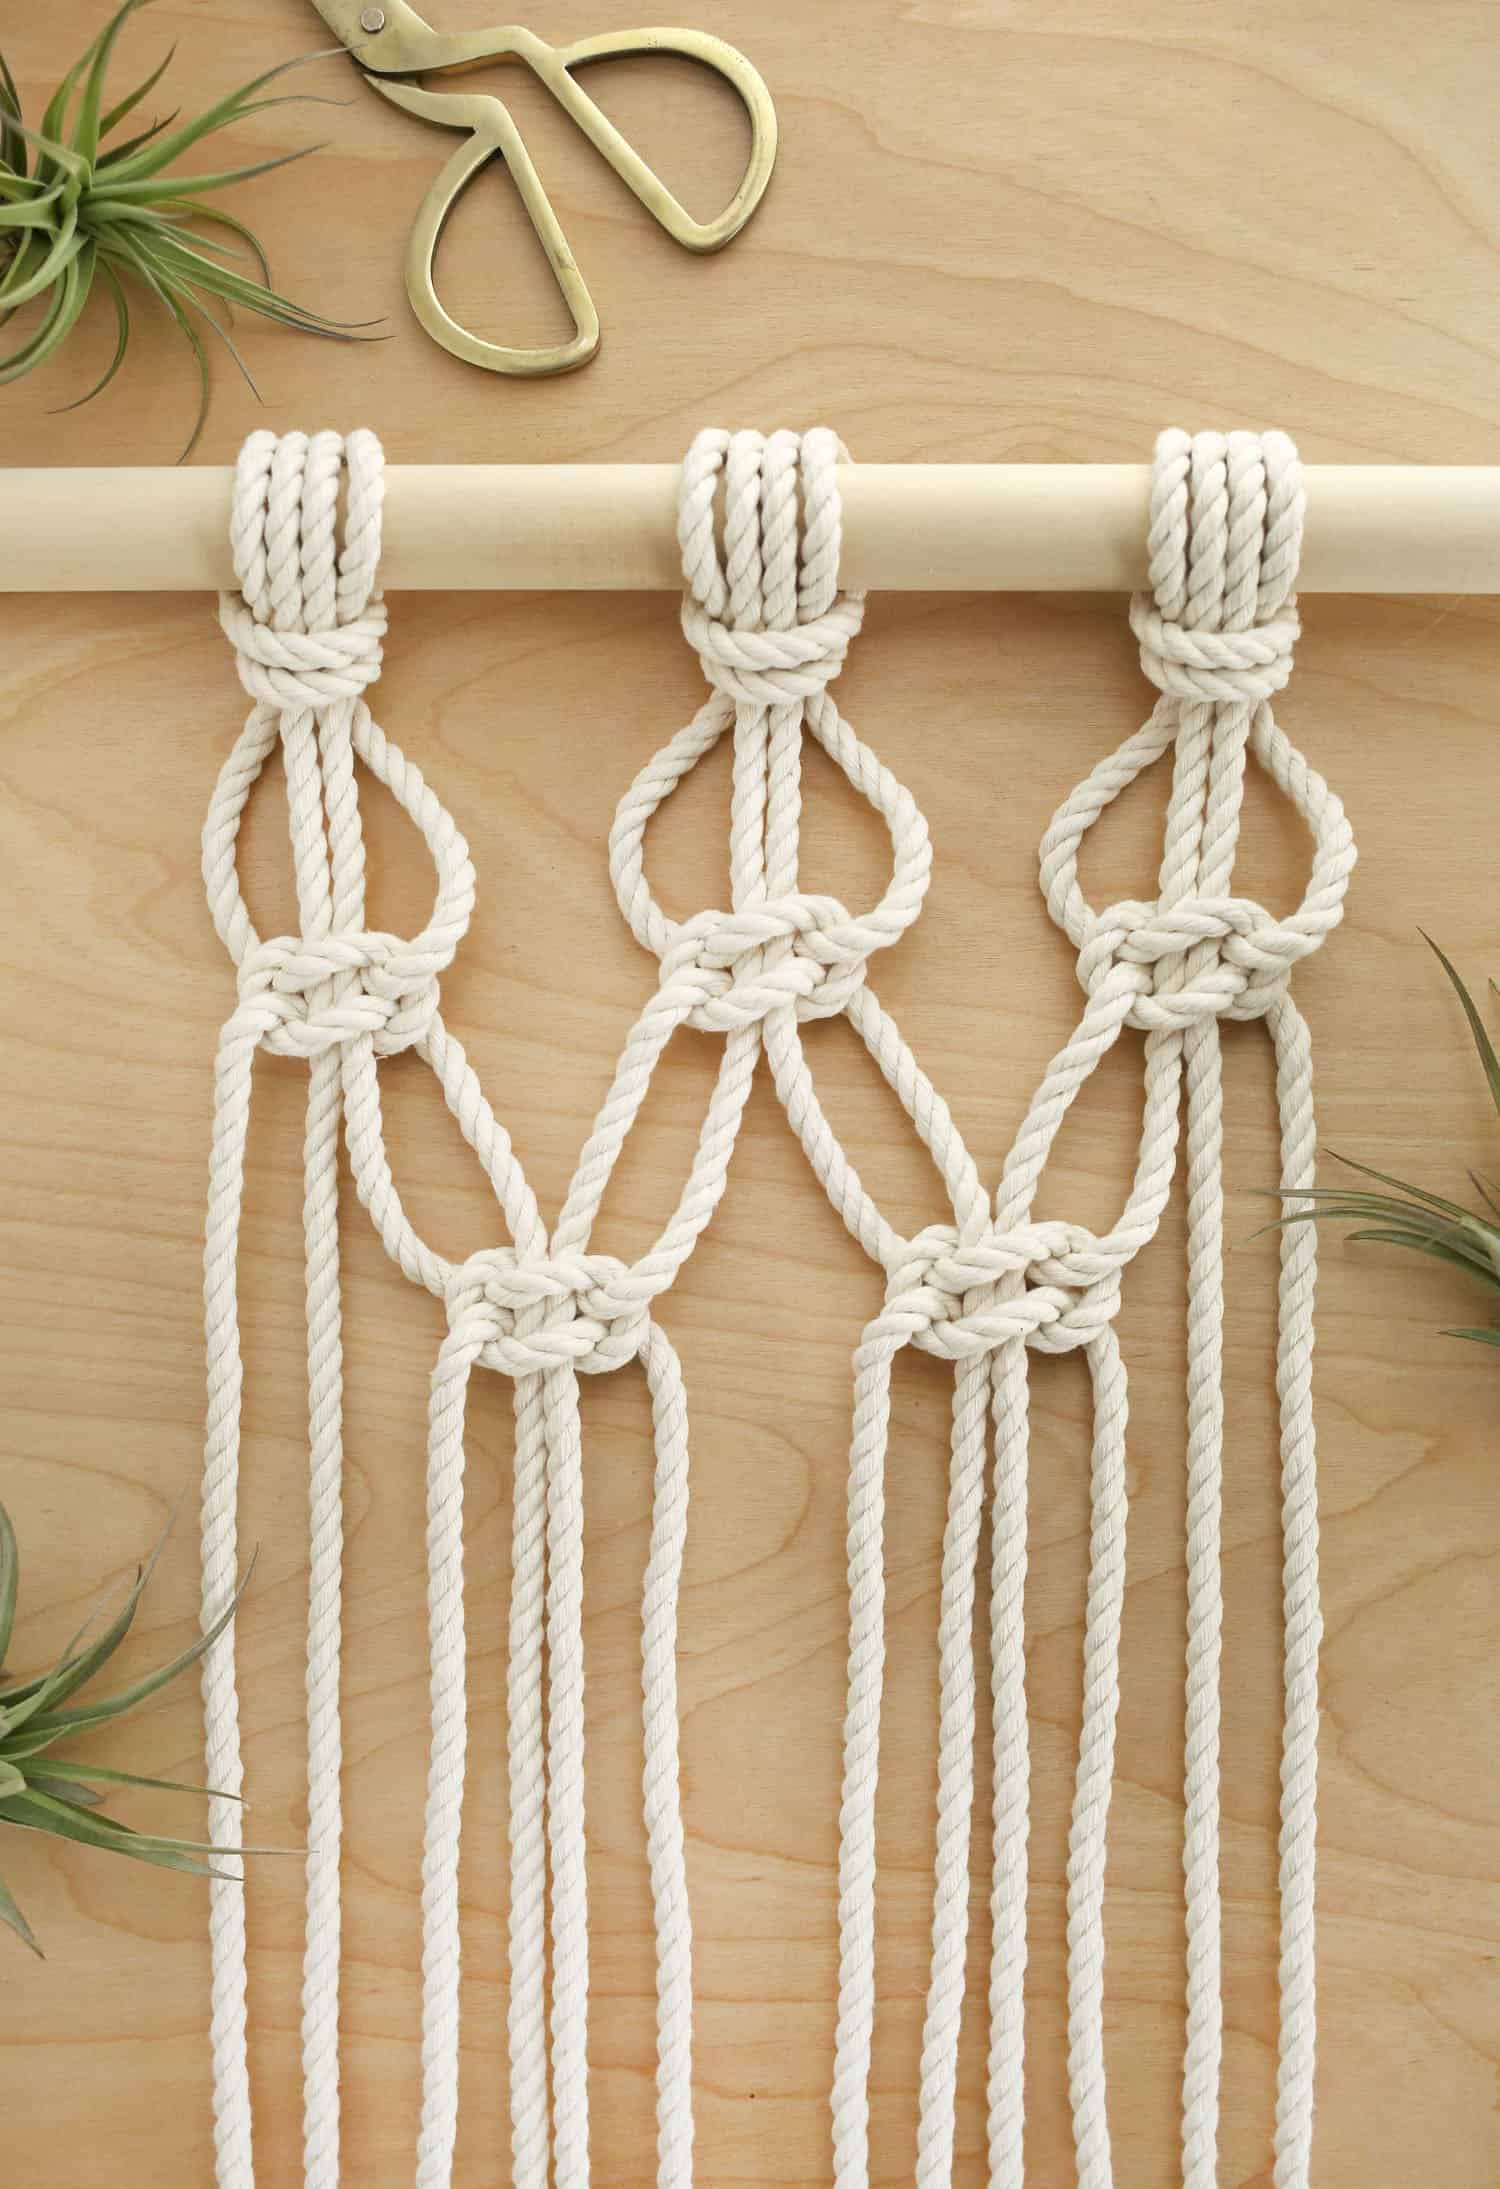
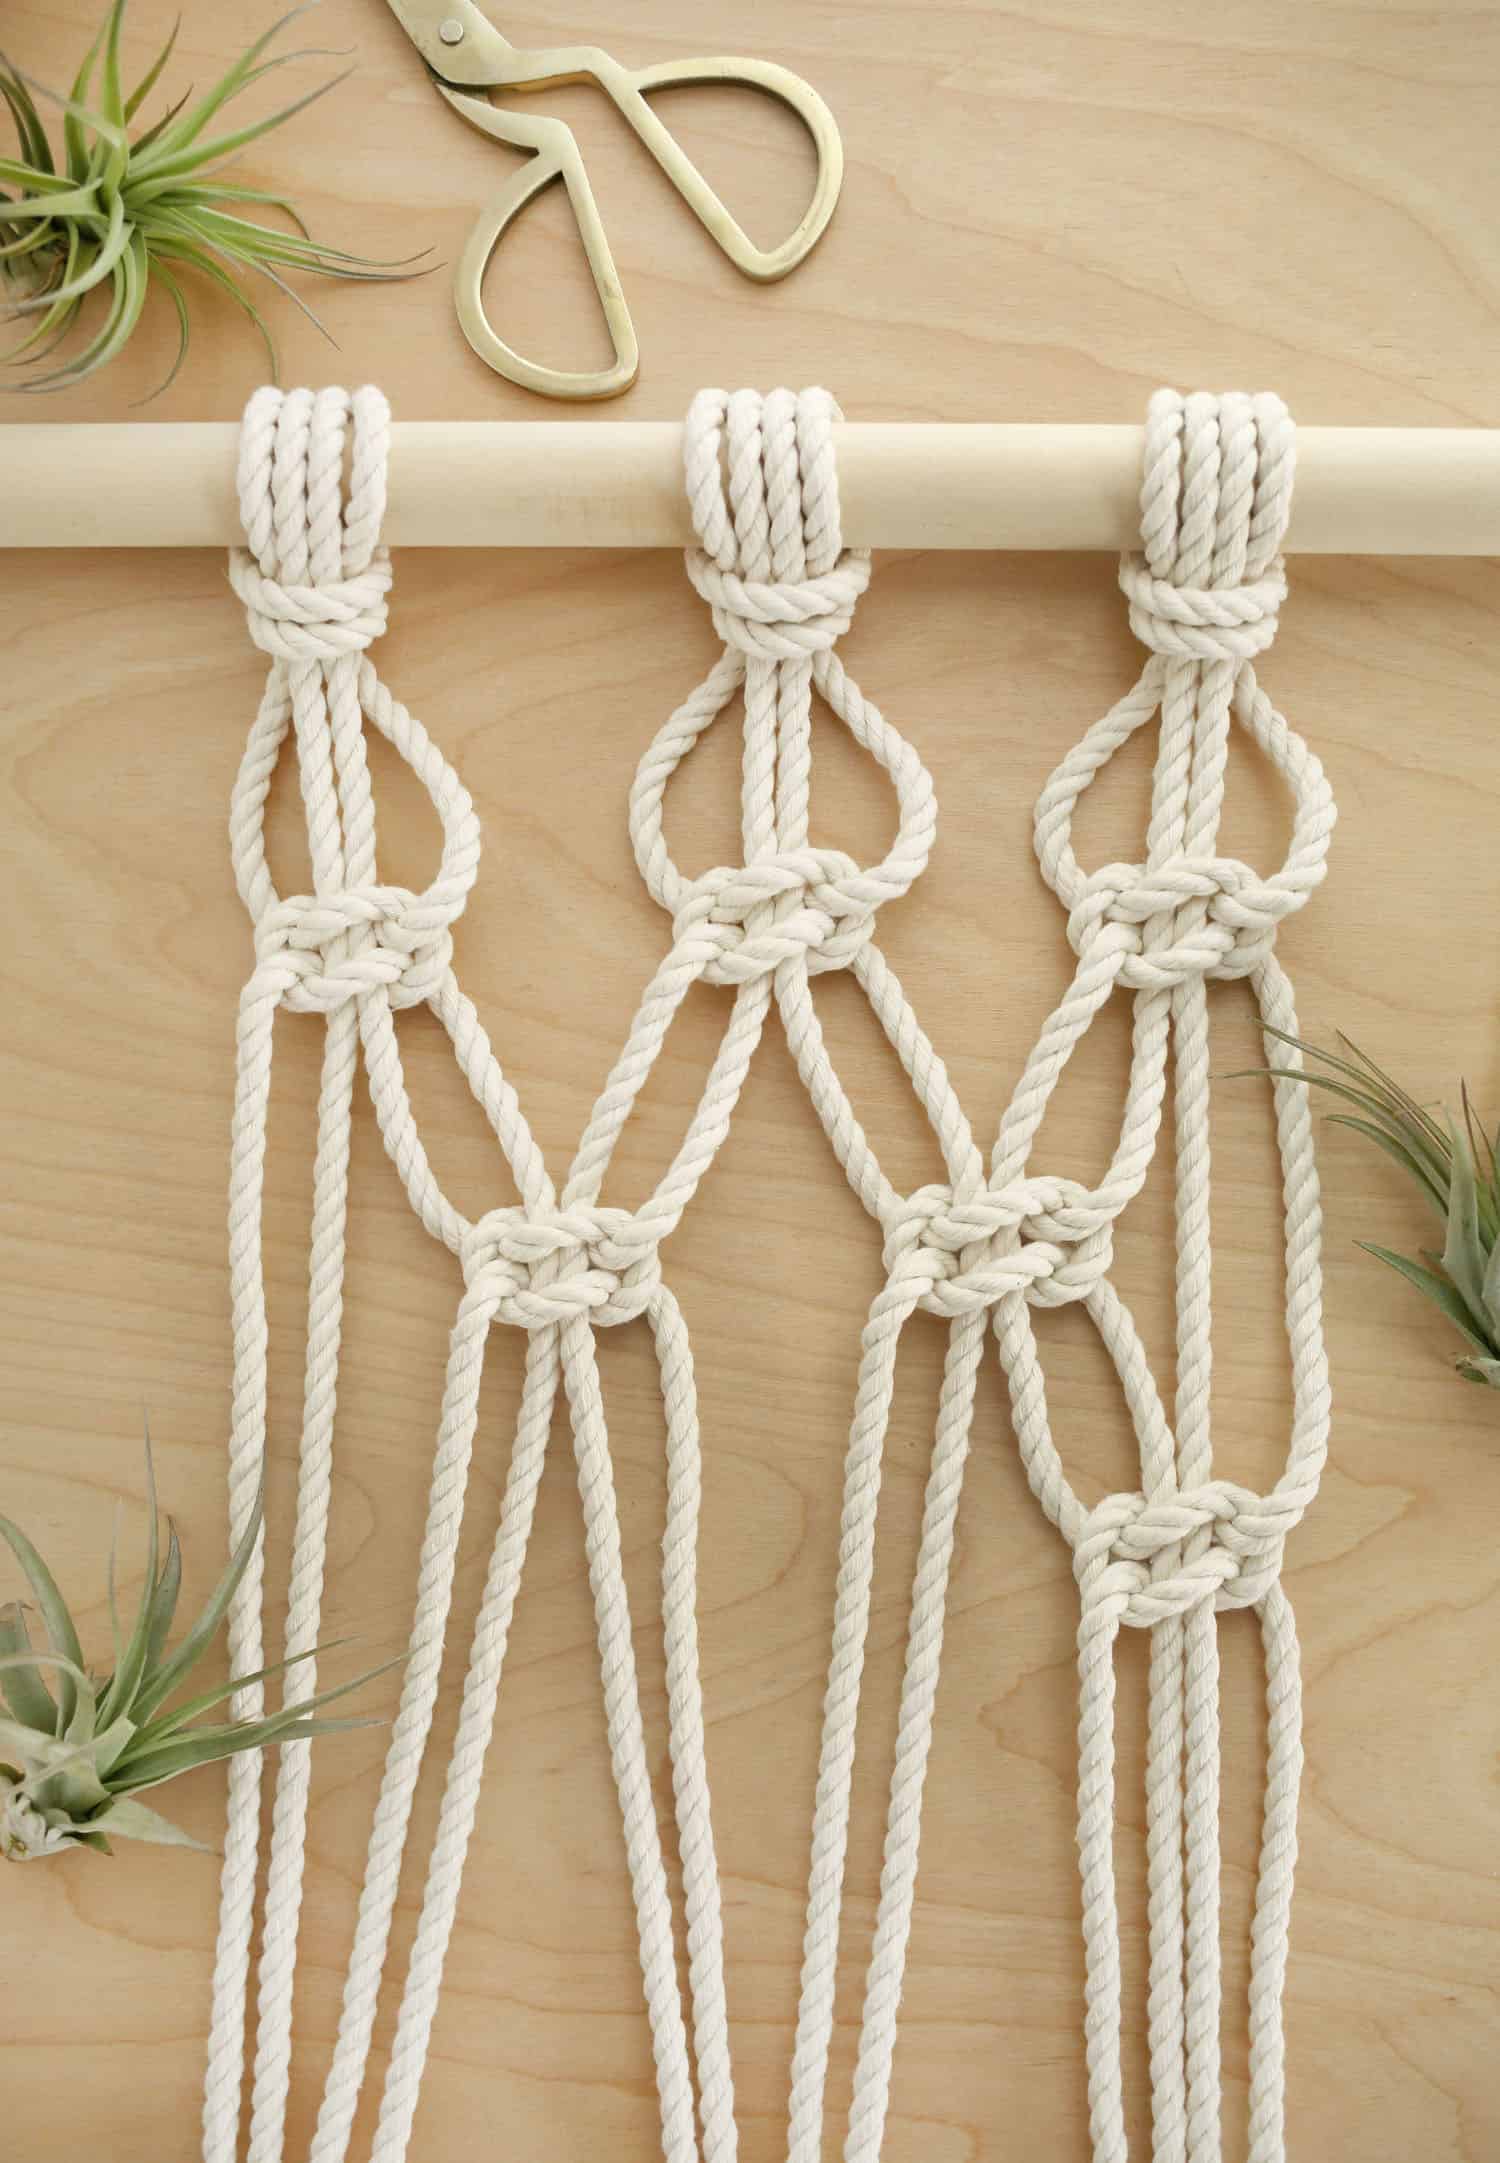
You can see how the square knots took shape in this photo. You should have 12 square knots in your first row. To create your second row of square knots, you’ll be using two strands from one square knot and two strands from the square knot next to it to create a new square knot that joins them together.
You can start from the center of your piece and work your way out on either side (how I prefer to do it) or you can start from one side and move your way across. As you can see, when you get to the edges of your second row, you’ll have an extra pair of rope strands on each side. That’s next.
When you’re adding in your knots, be mindful of the space between each row. You don’t want to start tying things closer and closer together or you’ll end up with a lopsided wall hanging.
Sometimes it’s helpful to step back about six feet to check on your composition before continuing on. Trust me, you won’t want to later realize it’s crooked enough to be annoying.
 Knots on the Edge
For this design, I’m allowing about 2.5″ of space between all of my knots because I want the room divider to feel light and airy. When I add in my third row of knots, I’ll be back to my original pattern of using all of the strands.
The space that your outer rope creates on the absolute left side of your divider and then the right side of your divider should be a little bit longer than twice as long as that. You want it to have enough slack to create a scallop shape.
My scallops held their shape in some parts of my divider but got heavy in other parts. I’m assuming it’s tricky to get that just right, but do your best.
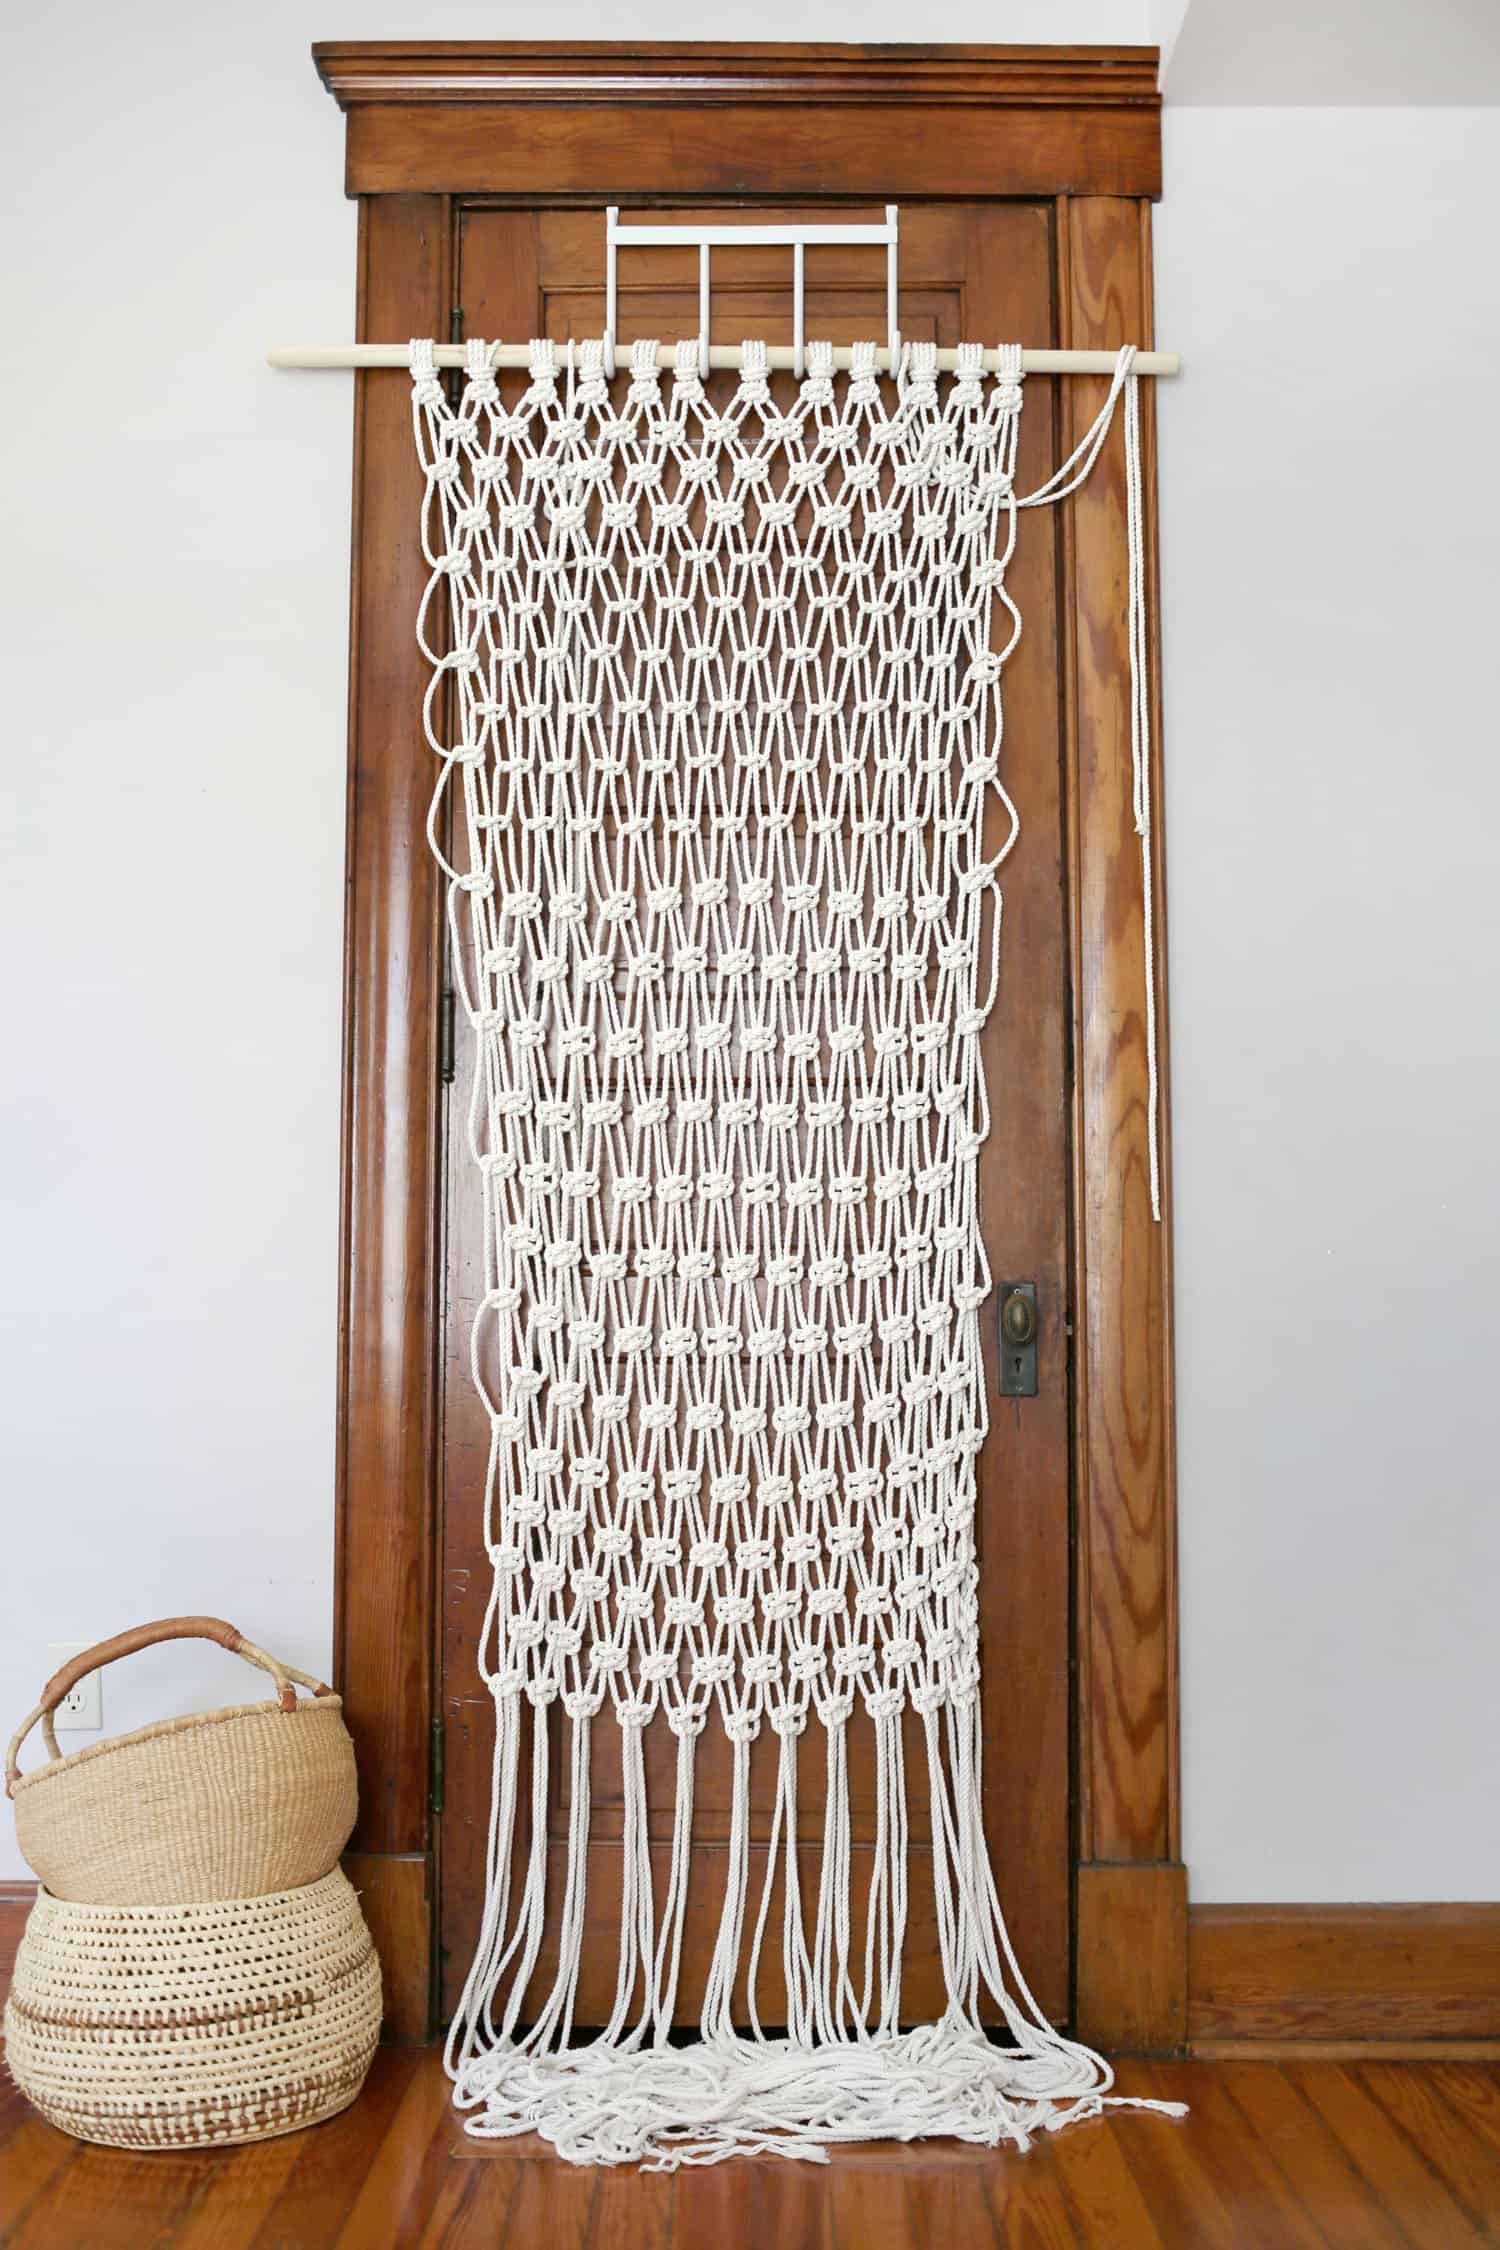 For my pattern, I did four alternating rows of square knots and then switched it up and did six alternating rows of half knots. Then I finished up the rest of the divider with 13 alternating rows of square knots again.
This kept things feeling consistent enough to make a statement but also added a bit of a subtle design change to keep it from looking like I’d hung a hammock from the ceiling!
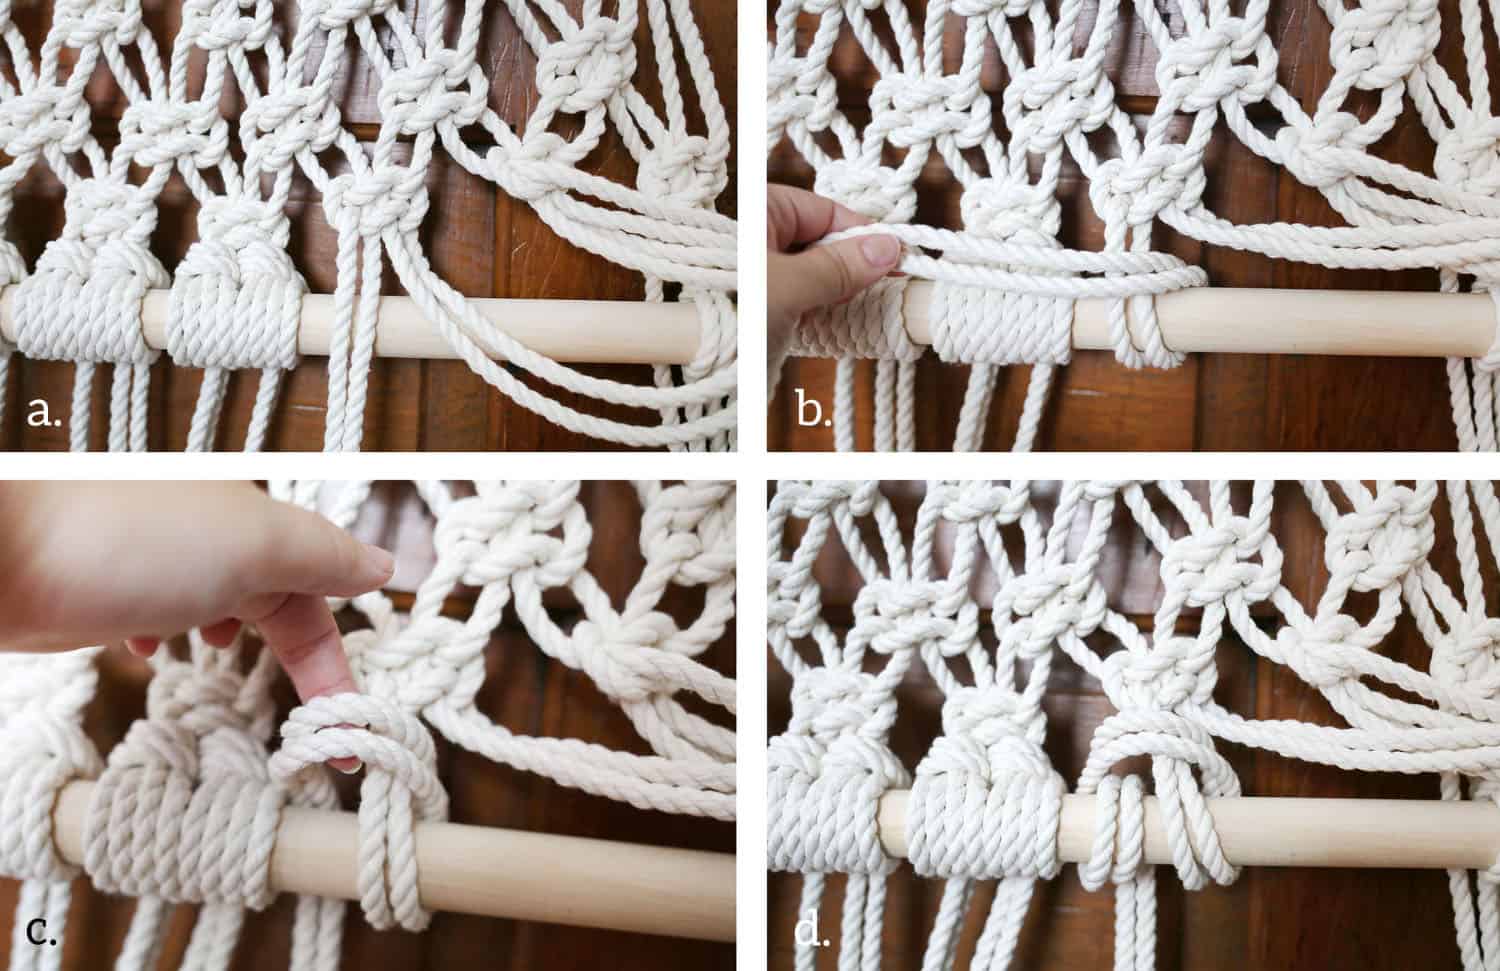 To add the bottom dowel to your room divider, you’re going to create more lark’s head knots. You can’t create them the same way you started, so we’re doing it backwards. I’ve started with a few already attached to show you how it’ll look when it’s done.
A: Separate the four strands underneath one of your square knots and set two aside. B: Wrap the other two strands all the way around the dowel until you wrap inside and over the top of the same two strands. C: Wrap them on the other side of the strands and back behind the dowel. D: Continue around the front of the dowel and tuck under the loop you just made. It will leave a fringe down the back side of the dowel. This is just one of the two lark’s knots you’ll make per square knot.
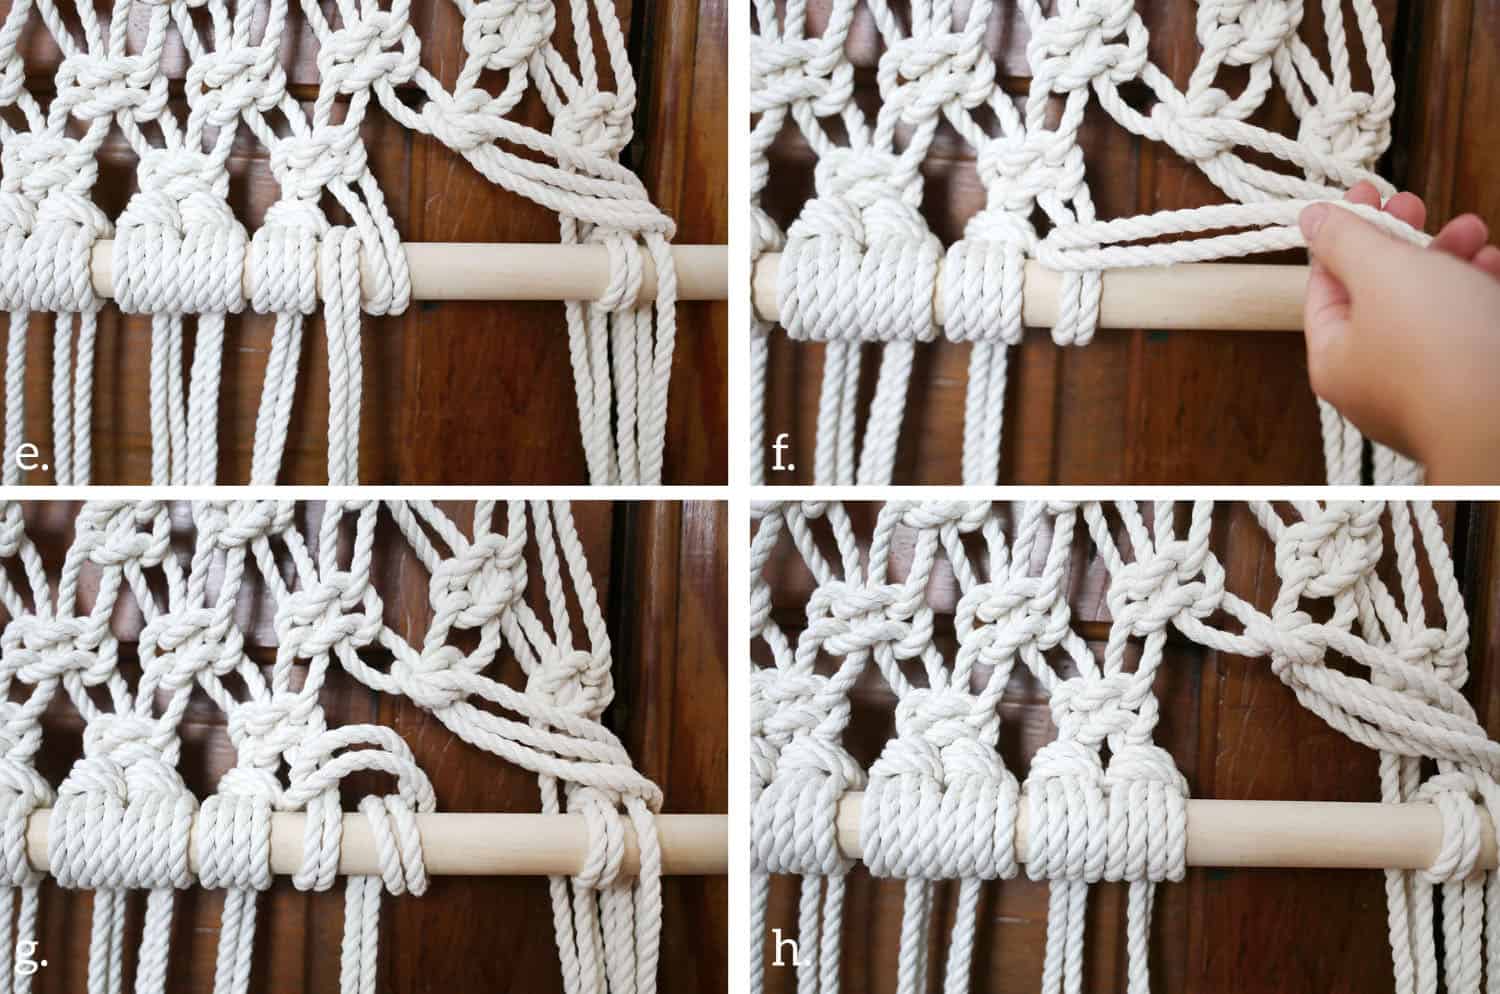 E: Bring the other two strands from that square knot back over and wrap them around the dowel and to the left side. F: Wrap them over the top of themselves. G: Wrap them behind the dowel and all the way back around and under the loop you just created. H: Scoot that knot in close to the first one you made and make sure things are consistently taut. Repeat with each of the other strands in each square knot.
 Trim your fringe to the length you need. We have 10-foot ceilings, so even though this room divider is massive, I had to hang it from the screws in my ceiling with another 18″ of rope.
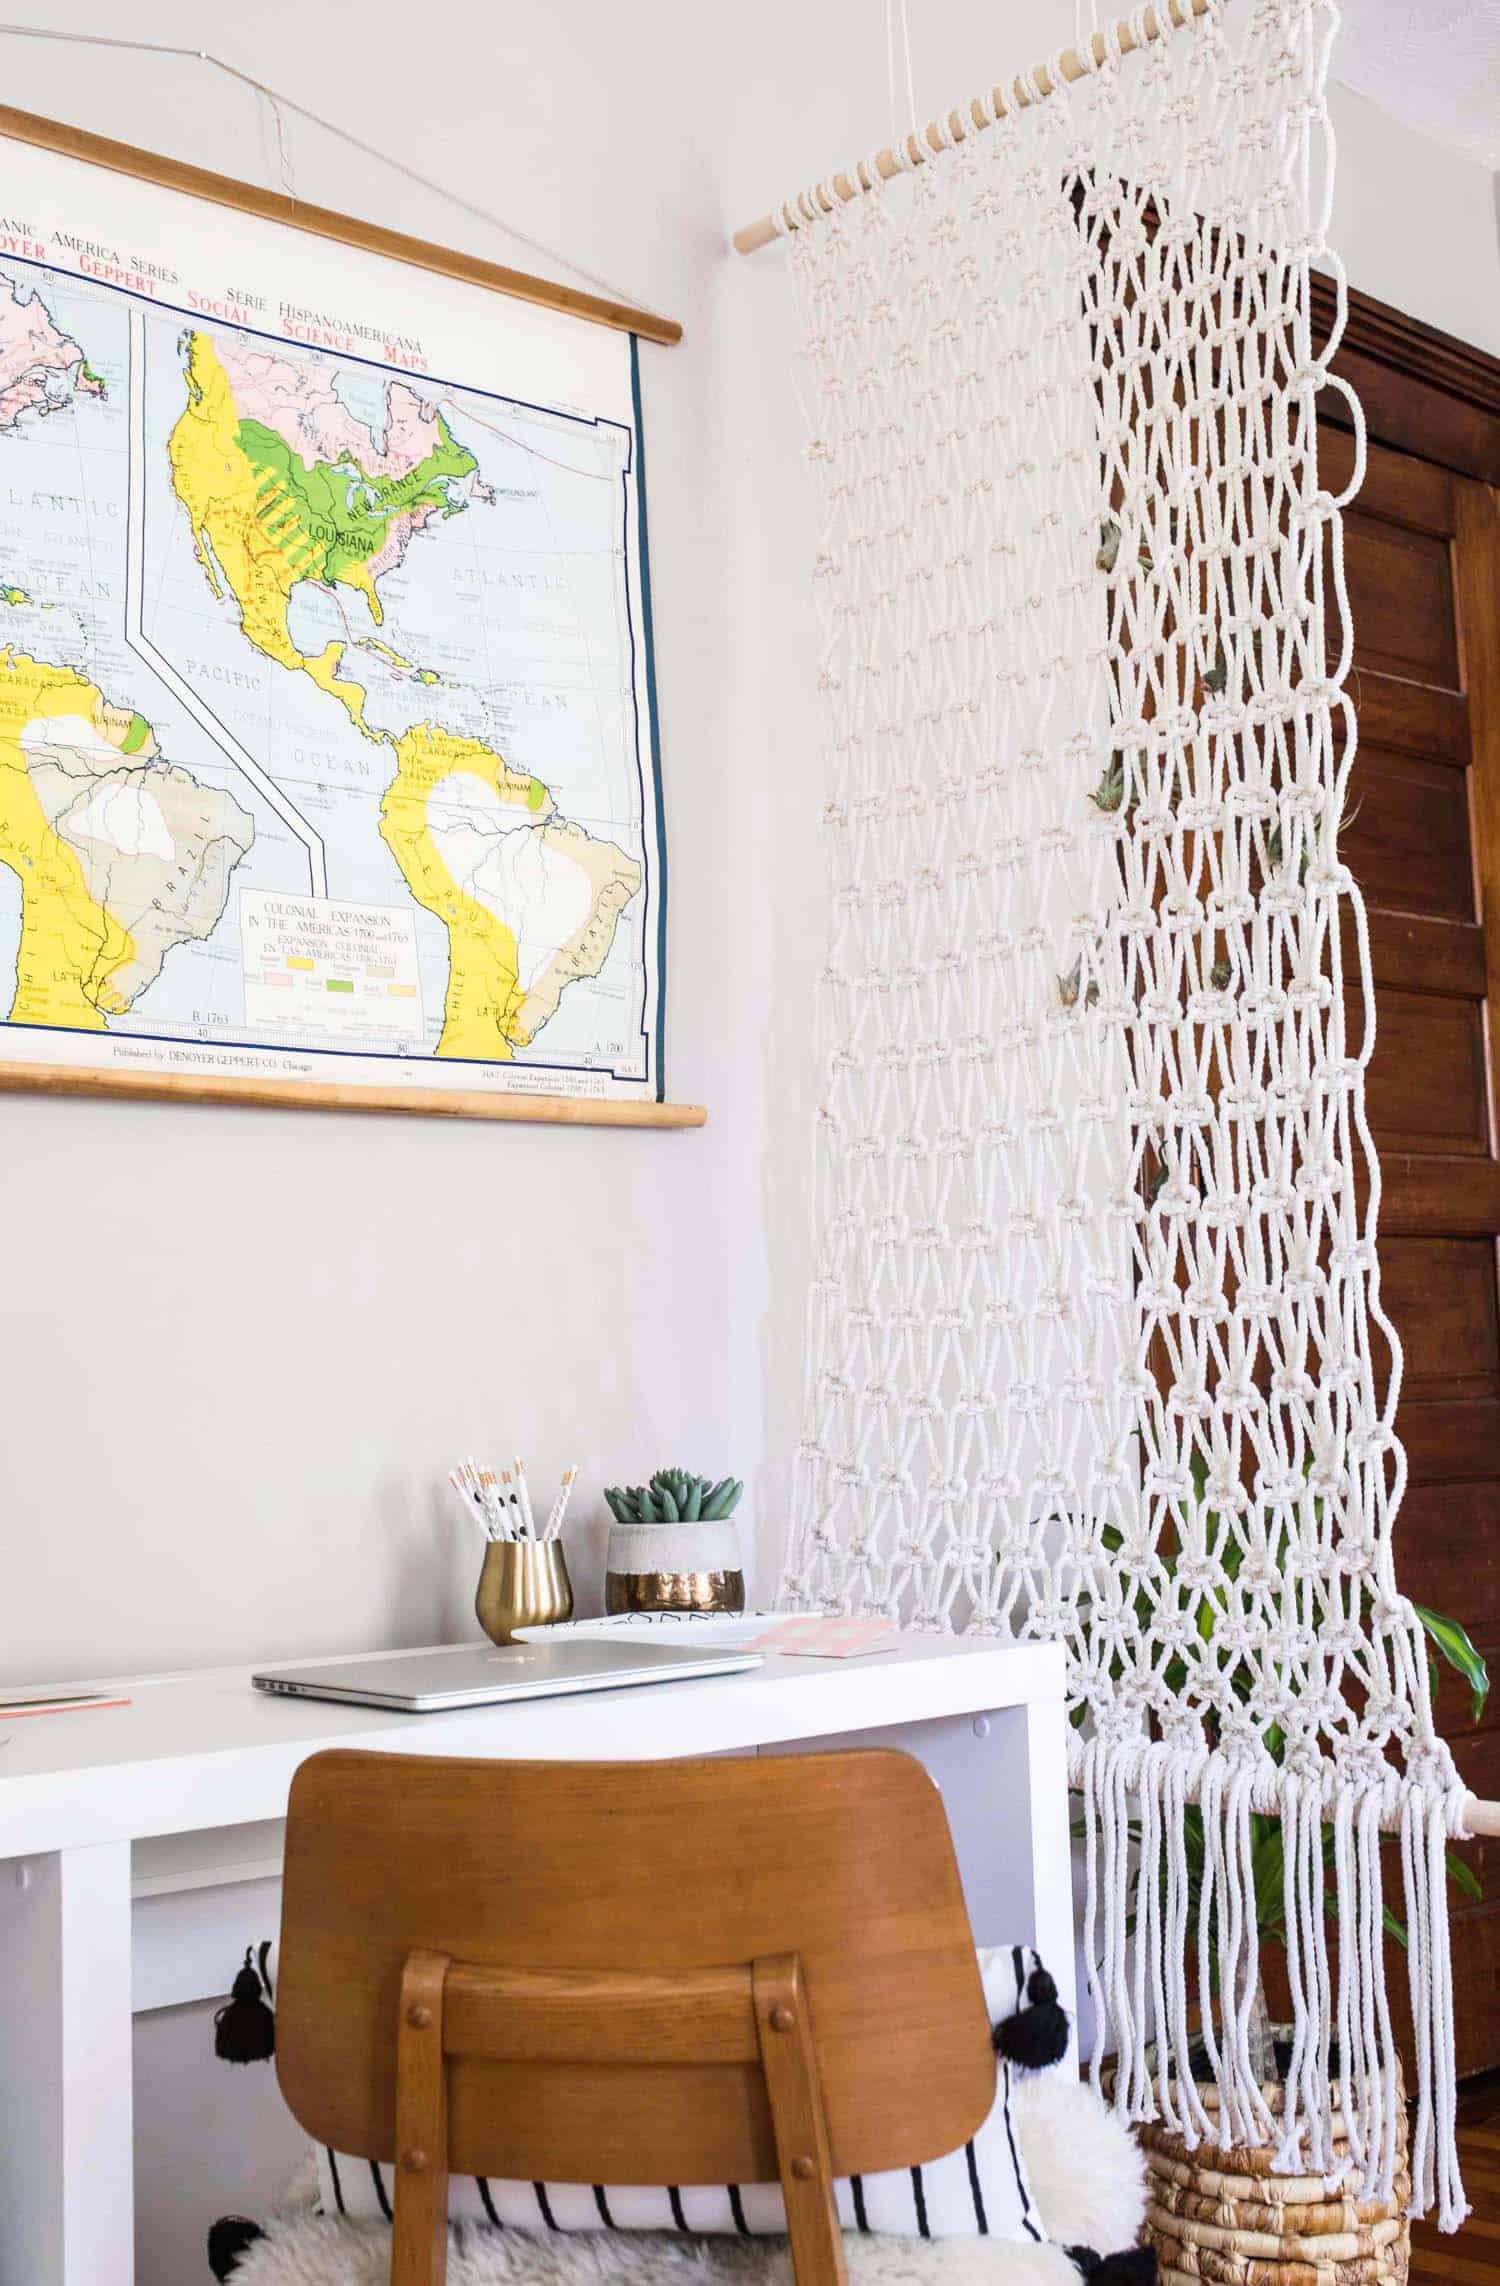
 If you don’t need something practical to help divide a room, this would be equally as stunning against a painted wall for plenty of contrast or even used as a simple party backdrop with a floral swag.
Either way, this is a great project for anyone wanting to go big with a simple design and introduce a little hygge just in time for fall.
Wanting to learn macrame for the first time? My friend, Elsie Goodwin, over at Reform Fibers teaches simple techniques through her Instagram feed and sells her unique patterns in her shop. –Rache

I’m making a three section room divider and it’s bowing on the sides of the middle section. Not looking like the one in the book. Could it be that I’m trying knots too tight? Didn’t think I was. Thanks
Great job!!! Nice ideas for divide a room.
Nice ideas for dividing a room. its looks really awesome.
Thanks for good information.
———————————————————
Highly recommend a excellet site(http://www.windowsofficekey.com) to get microsoft windows and office product keys.They give wholesale price and professional technical support of software activation.guarantee 100% works of product key.
This looks so cool, especially with the plants!
https://www.makeandmess.com/
Love this!!!
I’m so glad! It was really fun to make.
I love this DIY! I’m really into macrame now and I’m also looking into getting a studio where I’ll need to find ways to divide up my space, so this project is both practical and fun! Thanks for sharing.
-Helen
http://www.sweethelengrace.com
Sounds like the perfect DIY for you! It’ll still let plenty of light in, too. 😉
Fantastic room
New post:http://thepinkpineappleblog.blogspot.com/2017/10/nyfw-day-5.html
Thanks so much!
So cute! What’s the source of the desk, please?
Fanny, I purchased it on Craigslist but it may be Better Homes & Gardens.
Thanks RAchel!
This is SO cute! Such a great idea and I love the air plants in it too!
http://www.themoptop.com
Another reason to buy a few more! 😉 -rachel
The post didn’t have that aesthetic ABM style I’m used to seeing because there were 10 MediaVine ads sprinkled throughout the post.
This is so creative and cute, I love it!
Paige
http://thehappyflammily.com
Thanks so much! -Rachel
I love macrame as wall art, but this room divider makes it even more functional! Perfect for a guest bedroom that also functions as a office, can finally divide up the space tastefully!
Exactly! That is sometimes half the battle!
This is such a simple way of dividing up the room. It looks really nice!
Charmaine Ng | Architecture & Lifestyle Blog
http://charmainenyw.com
Thanks, Charmaine!
This is so cute! I love how you added the air plants. We all need a bit more hygge in our lives with winter fast approaching… 🙂
COLLEENWELSCH.COM
More hygge, please!!! It’s finally dreary and chilly outside today so it’s time to cozy up inside!
This is so cute!
xo, Elisabeth
http://elisabethhayes.com
Thank you!!